Pneumatic tools can be used with air compressors, which simplifies do-it-yourself projects. A compressor only requires the electrical wire and hose to be plugged in to be assembled, making them ideal for beginners. Maintain the air pressure in the hose below the value indicated on your power tool by keeping an eye on the pressure gauges. After switching between devices, don’t forget to adjust the pressure, and when you’re done, release the drain valve. Use these safety measures each time to ensure the effectiveness and safety of your work. keep reading and know more about how to use an air compressor.
Tires are among the most crucial components of any car because they act as the link between the vehicle and the ground, keep it on the road, and promote safe driving. Of course, provided we treat them with respect. If you don’t use all-season tires, remember that switching from summer to winter tires and back again as the season change is a good solution. A car compressor is a very helpful tool that you should always carry around. Why? The following explains this.
Why Should I Check the Pressure in My Tires

Tire pressure significantly impacts the car’s grip on the road and how comfortable it is to drive. Cornering or driving on wet or slick surfaces can be dangerous with over- or under-inflated wheels. Tires not inflated per the manufacturer’s recommendations may also wear out much more quickly, costing the driver more money.
Using a small 12V compressor to check the tire pressure will enable us to keep the tires in good condition for an extended period and improve overall road safety.
Unexpected Traffic Conditions
A small mobile tire air compressor or wheel compressor can be helpful while driving in various circumstances. For example, imagine you and your family are embarking on a more extended trip, but our temporary spare tire has a problem (this happens surprisingly often). Naturally, if we encounter a flat tire while traveling, we can pull over and quickly swap out the damaged wheel for a temporary spare (if we have it in the car, and it is not damaged). However, having a compressor on hand will help us inflate the damaged tire if we don’t have a functioning spare wheel.
Road tire deterioration can take many forms. Although effective patching is possible with the allegedly convenient tire repair kit, you must also inflate the tire so that its the correct pressure. We won’t experience these issues thanks to the compressor in the car.
How to Use Air Compressor for Tires

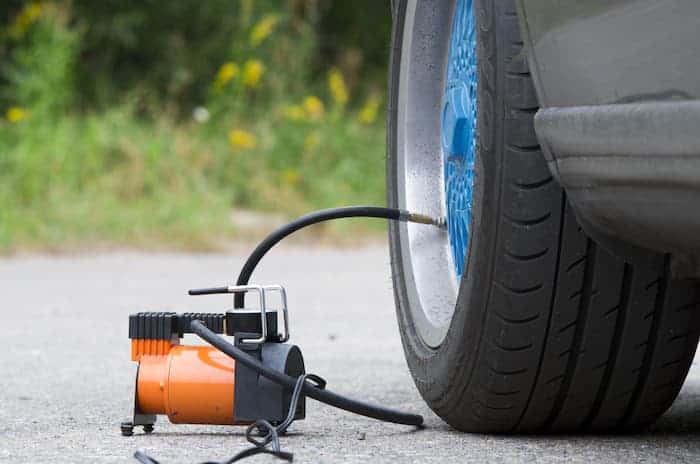
When a tire’s pressure is too low, a tire air compressor’s primary job is to inflate it. However, if combined with a sealant, it can also aid in tire repair. Connect the automobile tire compressor to a standard cigarette lighter socket. Using the battery’s terminals is an additional technique.
It merely takes a few minutes to inflate the tire on the road. Once this is through, we can proceed on our trip without risk. The compressor is relatively easy to use and requires no specialized skills. Additionally, the compressor is a lightweight tool that is easy to transport. The so-called “Spare wheels,” which significantly limit driving comfort and shouldn’t be used on extended routes, are a common source of complaints from drivers.
The car’s tire air compressor won’t take up much room, and it will undoubtedly come in handy at the worst possible time. Furthermore, it is crucial that the Aircom compressor function in harsh weather and low temperatures. This may be very important if we get a flat tire during snowfall or torrential downpour.
A traditional automobile pump requires the driver to exert force; with an intuitive pump, the compressor simply must be connected and launched; the rest of the procedure happens automatically. People older, in poorer physical condition, or tired of the walk will all welcome it. Car and bicycle tires are the two most popular tire types that you can inflate at home with an air compressor. Additionally, you can use an air compressor to fill the tires of tractors, lawnmowers, dirt bikes, and other machinery. Here are the fundamental procedures for using an air compressor to fill tires:
- Know your psi before you fill your tire. Your tire should contain a certain amount of air. In this manner, you’ll be able to monitor the pressure gauge and know when to stop. The owner’s manual, vehicle labels, or tire marks can all be used to determine the correct psi. Remember that filling a cold tire is ideal. The pressure gauge reading won’t be accurate.
- When you’re prepared to fill your tire with air, remove the stem cover from the valve stem. Once you’re finished, reattach the cap and store it in a secure location.
- Use the air compressor: Connect the air compressor’s hose to the valve stem using the tire chuck. After ensuring everything is in place, start the compressor to fill the tire. Ensure you don’t overinflate the tire by cautiously adding it.
How to Turn on an Air Compressor

Do not simply plug in your machine and start using it to spray paint, inflate tires, or connect to a pressure washer. Instead, remember to take these crucial procedures to ensure your safety and the longevity of your garage equipment; remember to take these essential procedures. In addition, when using power tools, you should wear safety glasses.
- Put the compressor together
Follow the air compressor manufacturer’s installation instructions while putting it together. The hose and regulator valve should be connected.
- Check the oil level
If necessary, check the oil level and add oil.
- Connect the power, then examine the relief valve
Connect the compressor to a grounded, three-pronged outlet. Verify that the system relief valve is correctly set.
Tip: A safety measure, the system relief valve will open if the pressure exceeds what the compressor can manage, preventing system failure.
- Start the compressor
Open the tank drain valve after starting the compressor to fill the tank.
- Join the hose to the power tool
To the hose, attach a power tool. Adjust the compressor’s pressure according to the device’s requirements.
Tip: Never apply more pressure than the maker of the power tool has advised.
- Turn the compressor off
Unplug the compressor after turning it off. Next, disconnect the hose and tool. Finally, turn on the drain valve to empty the tank of water. Ensure your compressor is in top condition.
How to Adjust Psi on Air Compressor

You might need to adjust the pressure to meet the PSI requirements of the tool in question each time you attach a different pneumatic tool to your air compressor. Therefore, before switching from one device to another, it is essential to understand how to adjust the air compressor, pressure regulator. Follow the steps below to complete everything:
- Start the air compressor
Before accurately adjusting the pressure gauge, you must turn on the machine and let it warm up for a typical operating cycle. Then, allow the tank to fill with freshly compressed air for a few minutes. For this adjustment technique, it’s crucial to have a full air tank. If the compressor makes noise once you turn on the power, that should mean that the initial air pressurization was successful.
- Verify if the tool is compatible with PSI
Check the PSI on the pneumatic tool you’ve reserved for this test once the activated tank is full of air. You must save that tool for a different air compressor with a higher capacity if the PSI of the device exceeds the compressor’s capacity. You can continue the test if the compressor pressure meets the needs of the current tool.
- Attach the air hose and tool
Connect an air hose to the pneumatic tool, and then connect the air compressor to the air pipe. Find the port on the instrument if you are connecting it for the first time. If you’re having trouble locating this functionality, refer to the user guide to find the port.
- Make pressure regulator adjustments.
Once the tool and hose connections are tight, change the pressure regulator’s settings to correspond with the PSI specifications shown on the tool. For example, on the right side of the pressure regulator on most compressors, there is a knob. The knob, however, could be put in a different location on some compressors. In the latter scenario, go to the user guide to identify the pressure regulator’s knob.
- Turn the regulator knob
Release the locking function on regulator knobs to spin the knob. The lock is typically push-pull triggered. First, pull the knob outward to unlock it from its locked state. Then, push the knob back in to lock it again. If this doesn’t work, look up your compressor’s regulator lock information in the user’s manual.
- Adjust the Pressure Upward or Downward
Turn the regulator knob clockwise to increase the pressure within the compressor’s air tank. The machine’s noise and the measurements on the monitor should make the rise in pressure obvious. To lock in the setting, push the knob back in after adjusting the regulator to the appropriate pressure.
The final step should be carried out back if you need to lower the pressure; simply spin the regulator knob anti-clockwise until the necessary pressure is reached, then put the knob back into the locked position.